Choppa Tools Choppa Tools

How to Stop a Gear Puller from Slipping

Time:2026-11-11 Author:Isabella
0%

A gear puller should grip firmly, stay centered, and move under steady pressure. When it slips, the problem may be a poor setup—not a weak tool. If you are asking, “why is my gear puller slipping,” inspect the jaw tips, puller alignment, and contact surfaces before turning the forcing screw again. A jaw resting on a rounded edge can skate off suddenly. A greasy shaft or unevenly seated arms can make the puller shift, even when the screw feels tight.

Small checks matter. Clean oil and debris from the contact points. Seat each jaw fully behind the gear, and keep the forcing screw square to the shaft. Use a puller sized for the gear, rather than extending the arms beyond their intended reach. Stop if a jaw bends, the tool tilts, or the gear begins to move unevenly. Forcing it harder can damage parts or cause the puller to release.

This guide explains how to diagnose slipping and improve the setup safely. It also covers when to stop and choose a different puller. I can’t verify a named expert’s quotation from the material provided, so I won’t invent one; that restraint matters when tool advice affects safety. A careful setup is less dramatic. It is usually more reliable.
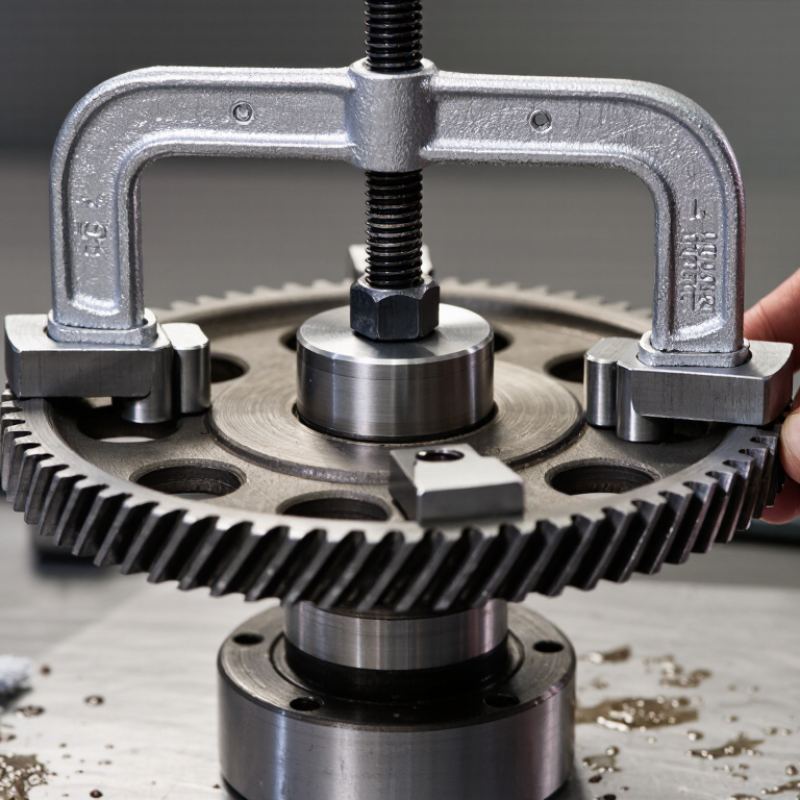
How to Stop a Gear Puller from Slipping

Identify Why the Gear Puller Is Slipping

A gear puller usually slips because its jaws are not gripping evenly, the center screw is off-axis, or the part is resisting more than expected. Look closely at the jaw tips: rounded edges, burrs, or oil can let them skate across a gear’s edge. Check that every jaw sits fully behind a solid shoulder, not on a chamfer or thin lip. Tiny defects matter. A puller that looks centered from above may still be tilted from the side, shifting force onto one jaw. I would recheck alignment before tightening further; it is easy to blame the screw too soon.

Also compare the puller’s rated capacity and jaw reach with the job, and inspect the screw and threads for damage. A bent arm or worn thread can make force uneven, even when the setup appears sound. Do not add a pipe or sudden impact to compensate for slipping.

The U.S. Bureau of Labor Statistics reported 2.6 million nonfatal workplace injuries and illnesses in private industry in 2023; that figure is not specific to pullers, but reinforces the value of controlled tool use.

If the jaws keep walking, stop, unload the tool, and inspect the contact surfaces and alignment again. A clean, square grip is more useful than extra force.

Check the Puller and Gear for Damage

When a gear puller slips, pause before tightening it again. A slipping tool may be warning you about damaged grip surfaces or a damaged gear. Stop and inspect. Wipe away oil and metal dust, then examine each jaw under good light. Look for rounded tips, bent arms, hairline cracks, or chipped edges. Check the forcing screw for flattened threads, galling, or a mushroomed end. Small defects matter. A jaw that looks only slightly polished may no longer hold securely. That is easy to underestimate.

Inspect the gear, too. Check the hub and the area behind its shoulder for cracks, burrs, or rounded contact edges. Confirm that the jaws sit evenly behind a solid shoulder, not on a thin tooth or sloped surface. If the gear is cracked or badly worn, stop. Choose a suitable removal method instead of forcing the puller. Keep the screw centered and apply load gradually; watch for a jaw beginning to walk outward. Keep fingers clear of loaded jaws. Replace bent or cracked parts, and follow the tool maker’s inspection guidance. One habit worth reconsidering is checking alignment only before applying pressure. Recheck it after the first turn, because the puller can shift as the load builds.

Clean and Prepare the Contact Surfaces

How to Stop a Gear Puller from Slipping
Clean and Prepare the Contact Surfaces

Before tightening a gear puller, clean every point where metal meets metal. Wipe grease, oil, and loose dirt from the puller jaws and the gear’s outer edge. Use a clean rag and a suitable degreaser, then let the surfaces dry fully. Even a thin oily film can let a jaw creep under load. Check the puller’s center screw tip, too. A rounded or damaged tip may not sit securely on the shaft.

Inspect the gear and jaws for burrs, cracks, or rounded edges. Replace damaged parts rather than forcing them to grip. Position each jaw evenly behind the gear, and make sure the center screw lines up with the shaft. Small alignment errors matter. It is easy to blame dirty surfaces when the real problem is a jaw that never seated squarely. Avoid adding oil to the contact points, and do not grind precision surfaces to create extra bite.

Tips: Keep your hands clear while applying force, and wear eye protection. Tighten the center screw gradually, pausing to check that the jaws remain seated. If the puller starts to tilt or slip, stop and reset it. More force is not always the answer.

How to Stop a Gear Puller from Slipping

Clean and prepare the contact surfaces before applying force.

Follow the steps in order: remove oil and grease from the contact points, wipe away residue, inspect for damage, position the jaws securely, and apply force steadily. Bar lengths show step order only; they do not represent measured test results.

Seat the Jaws and Align the Puller Squarely

A gear puller is less likely to slip when every jaw has a firm, even grip. Clean rust and grease from the gear’s contact edges, then inspect the jaws for cracks or rounded tips. Seat each jaw behind the gear, not on a thin lip that could bend. Check the setup. The hooks should reach to a similar depth, with no jaw perched at an angle. Center the forcing screw on the shaft end; a slight offset can make the puller walk as pressure rises.

Tighten the screw by hand until the jaws settle, then turn it gradually with a wrench. Watch the jaw positions during each turn. If one starts moving, stop and release the pressure before reseating all three. Don’t try to correct a slipping jaw while the puller is loaded. View the tool from the side, too: the screw should point straight along the shaft, and the puller frame should sit square to the gear. That small visual check is easy to skip. I still find it worth repeating, especially when access is cramped. Use a puller sized for the job, keep your face clear, and wear eye protection; a gear can release suddenly.

How to Stop a Gear Puller from Slipping - Seat the Jaws and Align the Puller Squarely
Check What to Look For Corrective Action Why It Matters
Jaw seating Each jaw is fully hooked behind a solid, load-bearing edge of the gear or component. Release the pulling force, reposition the jaws, and confirm that every jaw has secure, even engagement before tightening. Partially seated jaws can slide off as pulling force increases.
Jaw contact All jaws contact the component evenly and are not resting on chamfers, damaged edges, or loose parts. Choose a suitable contact point or puller configuration. Do not continue if the jaws cannot obtain a secure grip. Uneven or weak contact can make a jaw slip or damage the component.
Puller alignment The puller body is square to the component, and the center screw is aligned with the shaft axis. Reposition the puller so the center screw bears squarely on the shaft end. Check alignment again as the load increases. Side loading can shift the jaws and cause them to lose their grip.
Center screw contact The center screw sits securely on the shaft end or an appropriate protective tip, without slipping off-center. Recenter the screw. Use a suitable shaft-end protector when needed to prevent damage, and keep the screw aligned while tightening. A centered load helps the puller apply force along the shaft rather than at an angle.
Puller capacity The puller is suitable for the component and the required pulling load; no part is visibly bent, cracked, or damaged. Stop if the load exceeds the puller’s rated capacity or its condition is uncertain. Use an appropriately rated tool. Overloading or using damaged equipment can cause failure and injury.
Force application The screw advances smoothly, and the jaws remain seated as tension is applied. Tighten gradually while monitoring jaw position. If a jaw moves, stop, release the load, and reset the puller. Continuing after a jaw starts to slip can lead to sudden release.
Component resistance The component does not move despite increasing force, or the puller begins to shift or deform. Stop and reassess the setup. Check for retainers, interference, corrosion, or a need for a different removal method; do not exceed the tool’s rating. More force is not a safe substitute for correcting the cause of resistance.
Work area and protection The component is stable, bystanders are clear, and suitable eye protection is worn. Secure the workpiece where practical, keep hands out of the line of force, and use a protective barrier when appropriate. A loaded puller or released component can move suddenly.

Apply Steady Pressure and Recheck the Grip

Apply Steady Pressure and Recheck the Grip

A gear puller should stay square to the shaft, with each jaw seated fully behind the gear or bearing. Clean oily surfaces first, then inspect the jaws, forcing screw, and threads for wear or damage. Turn the screw by hand until the center point sits firmly on the shaft. Apply steady pressure with the correct wrench; avoid sudden jerks, which can shift the jaws. Pause there. Recheck that every jaw remains evenly engaged before adding force. If one starts to walk outward, release the load and reset the tool rather than trying to catch it under tension.

Keep your face and hands out of the puller’s line of fire, and use eye protection. The U.S. Bureau of Labor Statistics reported 2.6 million nonfatal workplace injuries and illnesses in private industry in 2023, a broad figure that is not specific to gear pullers but reinforces the value of careful tool handling. A slipping puller can also damage a shaft or gear. It is tempting to give the wrench one harder turn; that is often the moment to stop and reassess alignment, jaw fit, and the tool’s rated capacity. Follow the puller’s instructions, especially if resistance rises sharply or the grip changes.

FAQS

Why does a gear puller slip?

Its jaws may not grip evenly, the center screw may be off-axis, or the gear may resist removal. Tiny alignment errors matter.

How can I check the jaws?

Look for rounded tips, burrs, bends, cracks, or chipped edges under good light. Wipe away oil and metal dust. Small defects can be easy to miss.

Where should the jaws sit?

Place each jaw evenly behind a solid gear shoulder. Avoid thin lips, teeth, and sloped surfaces. Check the position from the side, too.

What should I inspect on the center screw?

Check for damaged threads, a flattened or mushroomed end, and a rounded tip. Keep the screw centered on the shaft.

How should I prepare the contact surfaces?

Wipe the jaws and gear edge with a clean rag and suitable degreaser. Let them dry fully. Do not add oil to gripping surfaces.

What should I do if a jaw starts walking outward?

Stop and unload the puller. Recheck alignment and contact points before resetting it. More force may make the setup less secure.

Can I use a pipe or impact to stop slipping?

No. Do not add a pipe or use sudden impact to compensate. Tighten gradually, and keep your fingers clear of loaded jaws.

When should I stop using the puller?

Stop if the gear is cracked, a puller part is bent, or slipping continues. Replace damaged parts and choose a suitable removal method. Rechecking after the first turn is a habit worth keeping.

Conclusion

If you’re asking, “why is my gear puller slipping,” start by checking whether the jaws are seated securely on the gear and whether the puller is aligned straight with the shaft. Slipping can happen when the jaws have a poor grip, the contact surfaces are dirty or oily, or the puller or gear has worn, bent, or damaged parts. Inspect both components before applying force, and replace or repair anything that appears compromised.

Clean the jaws and the gear’s contact points so they can hold firmly. Position each jaw evenly behind the gear, then center the puller and make sure it sits squarely rather than at an angle. Tighten the puller gradually with steady pressure, pausing to check that the jaws remain engaged and the tool stays aligned. If the grip shifts, stop and reposition the puller instead of forcing it; a careful setup can help prevent slipping and reduce the risk of damage.

Isabella

Isabella

Isabella is a dedicated marketing professional with a sharp focus on driving brand growth and engagement through strategic content creation. With an extensive background in digital marketing, she combines her passion for storytelling with her keen understanding of industry trends to deliver......